
Cheesecake Cookie Cups Recipe
Introduction
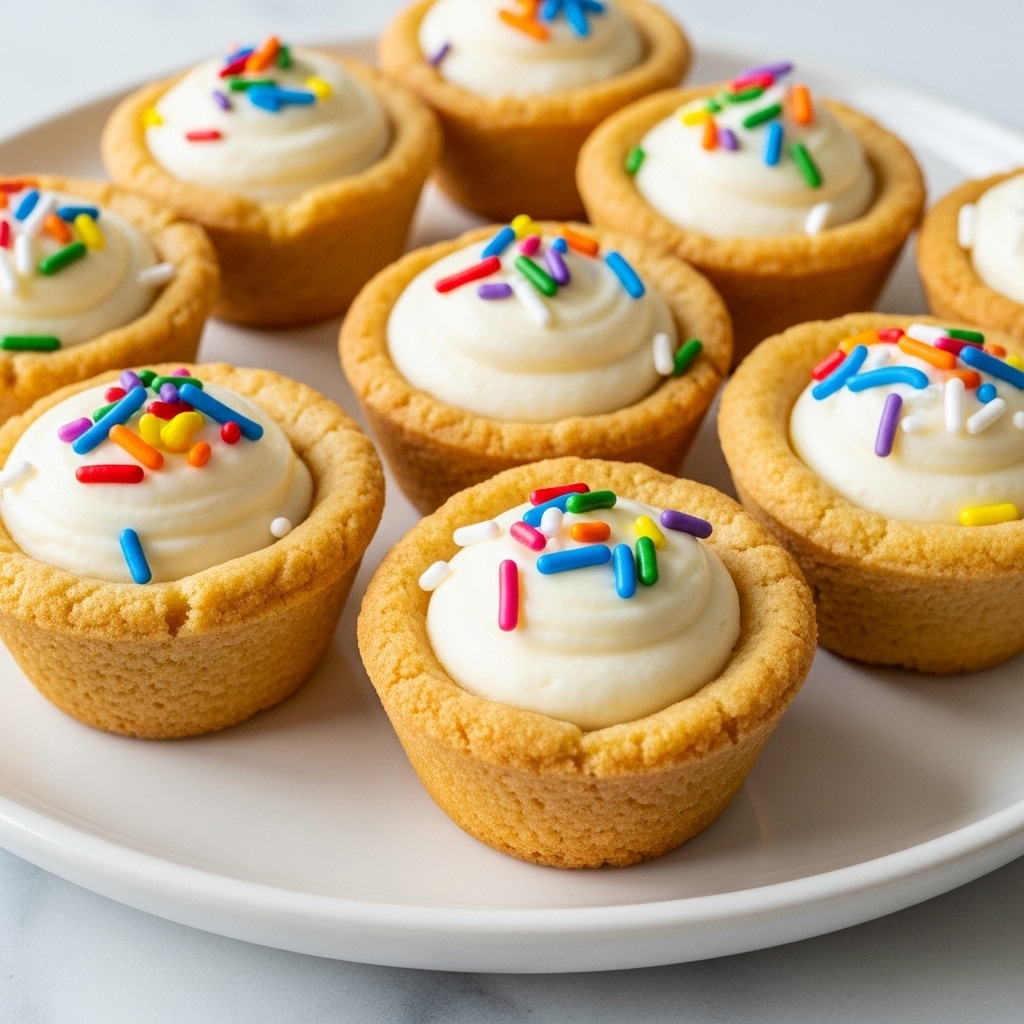
Cheesecake Cookie Cups combine the best of both worlds: soft, warm chocolate chip cookies shaped into mini cups filled with creamy cheesecake filling. These bite-sized treats are perfect for parties or a delightful snack that’s easy to make and irresistible.
Ingredients
- 1 tube (18 oz.) refrigerated chocolate chip cookie dough
- 8 oz. cream cheese (softened)
- 4 Tbsp. butter (softened)
- 1 tsp. vanilla extract
- 2½ cups confectioners’ sugar
- Sprinkles for topping (optional)
Instructions
- Step 1: Roll about one tablespoon of the cookie dough into a ball and place it into an ungreased mini muffin pan. Repeat with the remaining dough, then press the dough balls into the bottom and up the sides of each muffin cup.
- Step 2: Bake at 350°F (175°C) until lightly browned, about 8-10 minutes. Immediately after removing from the oven, use the handle of a wooden spoon to gently reshape the center of each cookie cup to create a well.
- Step 3: Allow the cookie cups to set and cool for about five minutes in the tin, then transfer them to a cooling rack to cool completely.
- Step 4: In a large bowl, use an electric mixer to beat the cream cheese, butter, and vanilla extract until smooth and creamy. Gradually add the confectioners’ sugar and continue beating until fully combined.
- Step 5: Transfer the cream cheese mixture to a piping bag (or use a plastic bag with the tip cut off, or a spoon) and fill each cooled cookie cup with the cheesecake filling.
- Step 6: If desired, top with sprinkles for a colorful finish. Refrigerate until ready to serve.
Tips & Variations
- For a festive look, use themed sprinkles according to the season or occasion.
- Mix in mini chocolate chips or crushed nuts into the cheesecake filling for extra texture.
- If you don’t have a piping bag, a plastic sandwich bag with a small corner cut off works perfectly to fill the cups neatly.
- Let the cookie cups cool completely before filling to prevent the cheesecake mixture from melting.
- You can substitute cream cheese with mascarpone for a slightly different but delicious flavor.
Storage
Store the cheesecake cookie cups in an airtight container in the refrigerator for up to 3 days. To maintain the cookie’s texture, add the frosting just before serving if storing longer. Reheat slightly in the microwave if you prefer the cookie warm, but avoid heating once filled with the cheesecake mixture.
How to Serve

Serve this delicious recipe with your favorite sides.
FAQs
Can I make the cookie cups ahead of time?
Yes, you can bake and cool the cookie cups a day in advance and store them in an airtight container. Add the cheesecake filling just before serving for the best texture.
What can I use if I don’t have mini muffin pans?
You can try using a regular muffin pan, but the cookie cups will be larger and take longer to bake. Alternatively, you can shape the dough into small cups by hand on a baking sheet, but the mini muffin pan provides the best shape and stability.
Print
Cheesecake Cookie Cups Recipe
- Total Time: 25 minutes
- Yield: 24 mini cheesecake cookie cups 1x
Description
Cheesecake Cookie Cups are a delightful, bite-sized dessert featuring a chocolate chip cookie base shaped into mini cups and filled with a smooth, creamy cheesecake mixture. Topped with colorful sprinkles, these treats are perfect for parties, dessert tables, or a sweet snack. They combine the chewy texture of baked cookie dough with the rich, tangy flavor of cheesecake for an irresistible combination.
Ingredients
For the Cookie Cups
- 1 tube (18 oz.) refrigerated chocolate chip cookie dough
For the Cheesecake Filling
- 8 oz. cream cheese, softened
- 4 Tbsp. butter, softened
- 1 tsp. vanilla extract
- 2½ cups confectioners’ sugar
Toppings
- Sprinkles for topping
Instructions
- Prepare the Cookie Dough: Roll about one tablespoon of the chocolate chip cookie dough in your hands to form a ball. Add each dough ball to an ungreased mini muffin pan, continuing until all dough is used up. Press the dough balls into the bottom and up the sides of each muffin cup to create a cup shape.
- Bake the Cookie Cups: Bake the cookie cups at 350°F (175°C) for 8 to 10 minutes, or until they are lightly browned. This bakes the cookie dough while shaping the cups for the filling.
- Shape the Cups: Immediately after removing the mini muffin pan from the oven, use the end of a wooden spoon handle to press and reshape the center of each cookie cup to emphasize the cup form. Allow the cups to cool and set for about five minutes in the pan before transferring them to a cooling rack to cool completely.
- Make the Cheesecake Filling: While the cookie cups are cooling, beat together the softened cream cheese, softened butter, and vanilla extract in a large bowl using an electric mixer until smooth and creamy. Gradually add the confectioners’ sugar and continue beating until the mixture is smooth and well combined.
- Fill the Cookie Cups: Transfer the cheesecake filling into a piping bag (or a resealable plastic bag with a corner snipped, or alternatively use a spoon), and pipe the filling into each cooled cookie cup evenly.
- Add Toppings: If desired, sprinkle colorful sprinkles over the cheesecake filling for a festive and decorative touch.
- Chill and Serve: Store the assembled cheesecake cookie cups in the refrigerator until ready to serve to keep the filling firm and fresh.
Notes
- Use softened cream cheese and butter for the smoothest filling texture.
- Make sure to cool the cookie cups completely before filling to prevent the cheesecake mixture from melting.
- You can substitute sprinkles with mini chocolate chips or crushed nuts for variation.
- Store leftovers in an airtight container in the fridge for up to 3 days.
- For an even quicker assembly, you may bake the cookie cups in advance and chill before filling.
- Prep Time: 15 minutes
- Cook Time: 10 minutes
- Category: Dessert
- Method: Baking
- Cuisine: American
Keywords: cheesecake cookie cups, chocolate chip cookie dough dessert, mini cheesecake cups, easy party desserts, no-bake cheesecake filling

