
Easter Bunny Coconut Tails Recipe
Introduction
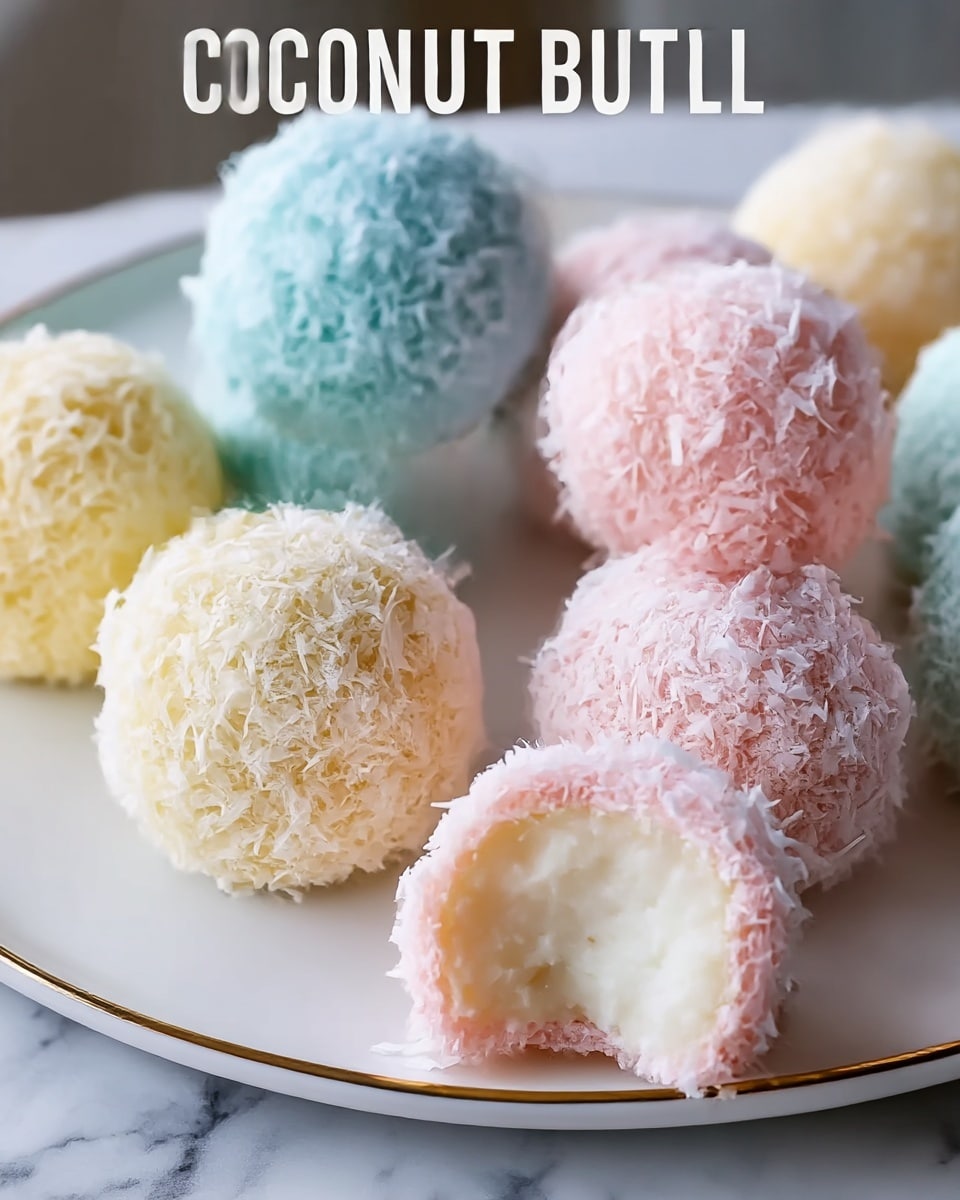
Delight in these charming Easter Bunny Coconut Tails, perfect for spring celebrations and sweet gatherings. These creamy coconut truffles are coated in colorful pastel white chocolate and finished with a fluffy coconut tail for a festive touch.
Ingredients
- 3 cups sweetened shredded coconut (for filling)
- 1 can (14 ounces) sweetened condensed milk
- 1 teaspoon pure vanilla extract
- 1/4 teaspoon salt
- 12 to 16 ounces white candy melts or white chocolate (for coating)
- Pastel gel food coloring (pink, blue, yellow, green)
- 1 cup sweetened shredded coconut (for rolling)
Instructions
- Step 1: In a large mixing bowl, combine 3 cups of sweetened shredded coconut, the sweetened condensed milk, vanilla extract, and salt. Stir until the mixture is thick, sticky, and well blended. If it feels too soft to shape, add more shredded coconut one tablespoon at a time until it can be pressed together easily.
- Step 2: Using a small cookie scoop or tablespoon, portion out the mixture. Roll each portion between your palms to form smooth balls about 1 inch in diameter. Place the balls on a baking sheet lined with parchment paper, spacing them slightly apart.
- Step 3: Chill the coconut balls in the refrigerator for 1 to 2 hours, or until firm to the touch. This helps them keep their shape during dipping.
- Step 4: Melt the white candy melts or white chocolate according to package instructions, heating in 20 to 30 second intervals and stirring until smooth. Divide the melted coating into separate bowls and add small amounts of pastel gel food coloring to each, mixing until the colors are evenly distributed.
- Step 5: Remove the chilled coconut balls from the refrigerator. Using a fork or dipping tool, dip each ball into the melted colored coating, rolling gently to cover completely. Lift out and tap the fork lightly against the bowl to remove excess coating. Return the coated truffle to the parchment-lined baking sheet.
- Step 6: Before the coating sets, sprinkle or roll each coated truffle in the remaining cup of shredded coconut to resemble a fluffy bunny tail. Let the truffles sit at room temperature until the coating hardens completely.
Tips & Variations
- Try adding a few drops of almond extract to the coconut filling for a subtle nutty flavor.
- Use different pastel colors for a more vibrant assortment perfect for Easter baskets.
- If you don’t have candy melts, high-quality white chocolate chips can be substituted, but watch carefully to prevent overheating.
Storage
Store the coconut tails in an airtight container at room temperature for up to 3 days or refrigerate for up to a week. Bring to room temperature before serving to enjoy the best texture. Avoid freezing as the coating may crack when thawed.
How to Serve

Serve this delicious recipe with your favorite sides.
FAQs
Can I use unsweetened shredded coconut instead of sweetened?
Yes, but the truffles will be less sweet. You may want to add a little extra sweetened condensed milk or a touch of sugar to balance the flavor.
How do I prevent the coating from melting when handling the truffles?
Make sure to chill the coconut balls thoroughly before dipping and work quickly when coating. If the coating starts to thicken, gently reheat it in short intervals to maintain a smooth dipping consistency.
Print
Easter Bunny Coconut Tails Recipe
- Total Time: 1 hour 20 minutes
- Yield: About 24 truffles 1x
- Diet: Vegetarian
Description
These Easter Bunny Coconut Tails are delightful no-bake truffles made from sweetened shredded coconut and condensed milk, coated in colored white chocolate or candy melts, and finished with a coconut coating to resemble fluffy bunny tails. Perfect for spring celebrations, these treats combine creamy, sweet coconut centers with a smooth, colorful candy shell.
Ingredients
For the Coconut Filling
- 3 cups sweetened shredded coconut
- 1 can (14 ounces) sweetened condensed milk
- 1 teaspoon pure vanilla extract
- 1/4 teaspoon salt
For the Coating
- 12 to 16 ounces white candy melts or white chocolate
- Pastel gel food coloring (pink, blue, yellow, green)
- 1 cup sweetened shredded coconut (for rolling)
Instructions
- Mix the Coconut Filling: In a large mixing bowl, combine the sweetened shredded coconut, sweetened condensed milk, vanilla extract, and salt. Stir thoroughly with a spoon or spatula until the mixture is thick, sticky, and well blended. If the mixture is too soft to hold its shape, add additional shredded coconut one tablespoon at a time until it can be pressed together easily.
- Shape the Truffles: Use a small cookie scoop or tablespoon to scoop portions of the mixture. Roll each portion between your palms to form smooth balls approximately 1 inch in diameter. Place the balls on a baking sheet lined with parchment paper, spacing them slightly apart.
- Chill the Truffles: Transfer the baking sheet to the refrigerator and chill for at least 1 to 2 hours, or until the balls feel firm to the touch. This step ensures that the truffles maintain their shape during dipping and prevents them from falling apart when coated.
- Melt and Color the Coating: Melt the white candy melts or white chocolate according to package instructions by heating in the microwave in 20 to 30 second intervals, stirring well between each until smooth and fully melted. Divide the melted coating into separate bowls and mix pastel gel food coloring into each to achieve soft spring shades. Stir until colors are evenly distributed.
- Dip the Truffles: Remove the chilled coconut balls from the refrigerator. Using a fork or dipping tool, lower each ball into the melted candy coating, roll gently to coat completely, then lift out and tap the fork lightly against the bowl to remove excess coating. Place the coated truffle back onto the parchment-lined baking sheet.
- Add the Coconut Finish: Before the candy coating sets, sprinkle or roll each coated truffle in the remaining shredded coconut to resemble fluffy bunny tails. Allow the truffles to sit at room temperature until the coating hardens completely.
Notes
- For best results, chill the truffles thoroughly to ensure they hold their shape during dipping.
- You can adjust the amount of shredded coconut if the filling mixture feels too wet or too dry.
- Use gel food coloring for vibrant colors without thinning the coating.
- Store the finished truffles in an airtight container at room temperature or in the refrigerator for up to one week.
- White chocolate can be substituted with white candy melts for easier melting and coating.
- Prep Time: 20 minutes
- Cook Time: 0 minutes
- Category: Dessert
- Method: No-Cook
- Cuisine: American
Keywords: Easter treats, coconut truffles, no-bake dessert, candy melts, spring dessert, holiday candy
