
Best Witch Hat Halloween Cookies Recipe
Introduction
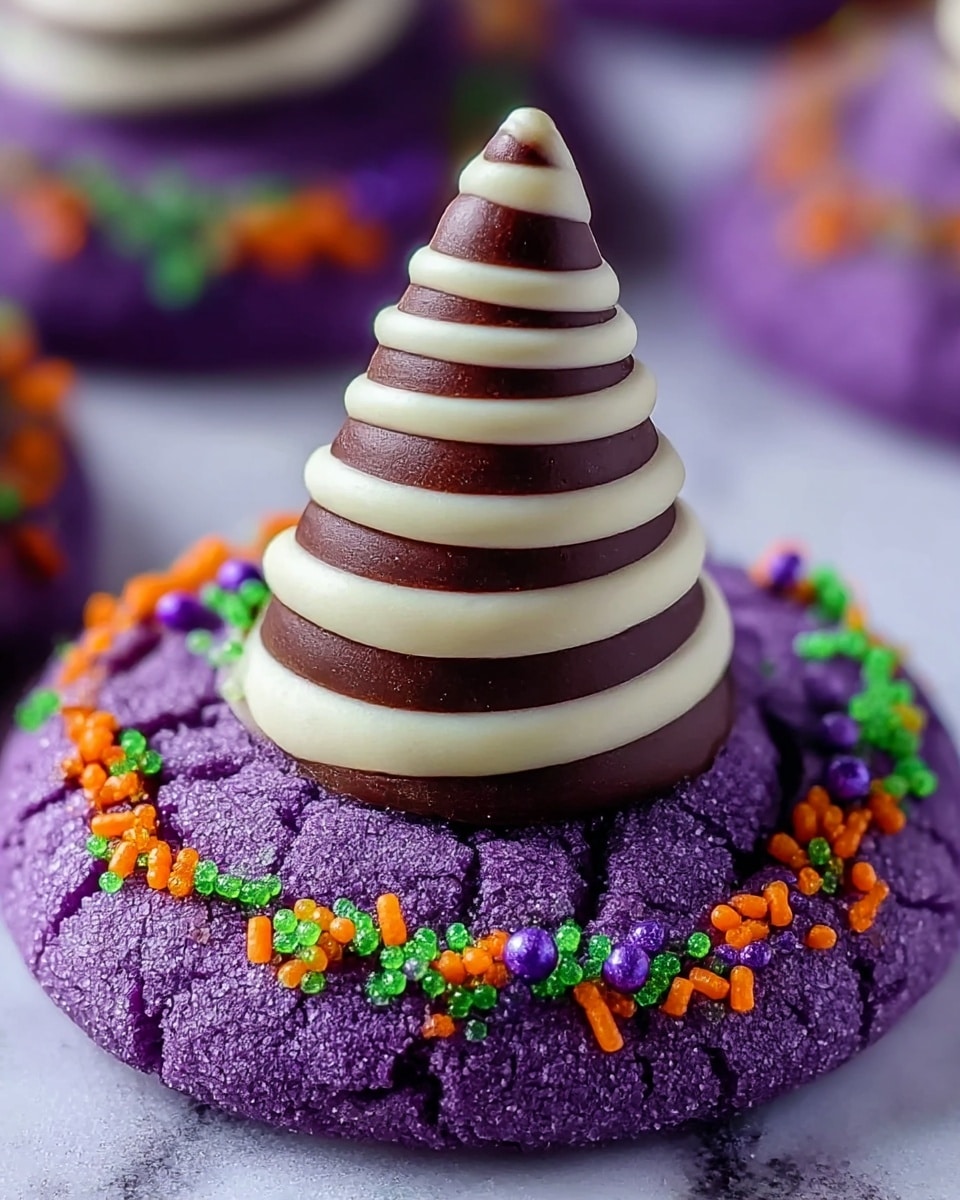
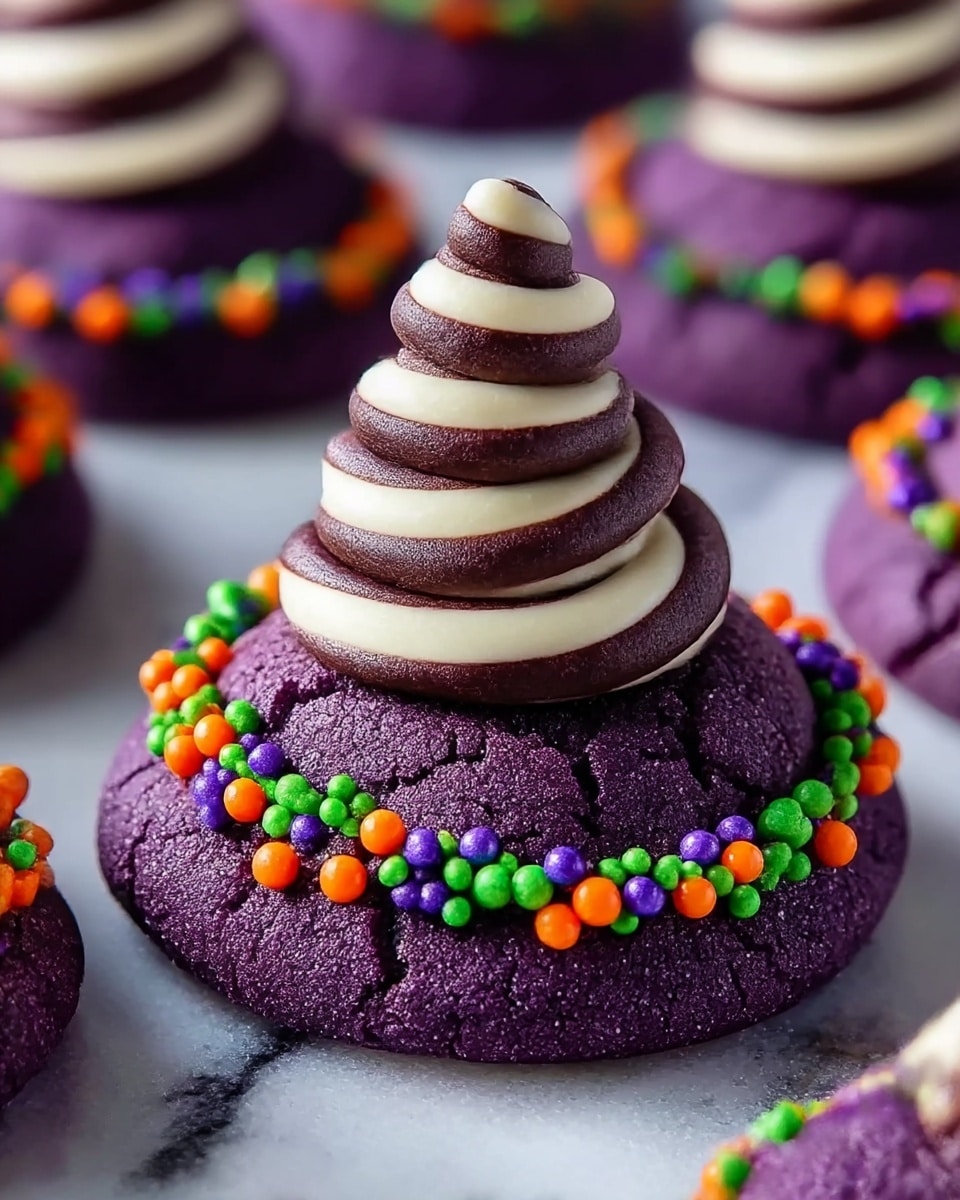
Celebrate Halloween with these fun and festive Witch Hat Halloween Cookies! They’re soft, peanut butter-flavored treats with a striking purple hue, topped with chocolate kisses for a charming witch hat look. Perfect for parties or a spooky snack.
Ingredients
- 1 1/2 cups all-purpose flour
- 2 tsp cornstarch
- 1/2 tsp baking soda
- 1/4 tsp baking powder
- 1/8 tsp fine sea salt
- 1/2 cup unsalted butter, softened
- 1 cup white sugar
- 1 large egg
- 3/4 cup smooth peanut butter
- 1 tsp vanilla extract
- Purple gel food coloring
- Halloween sprinkles or purple sanding sugar
- 33 chocolate kisses or Hugs candies, unwrapped
Instructions
- Step 1: Preheat oven to 350°F (175°C) when ready to bake. Line sheet trays with parchment paper. In a large bowl, whisk together the flour, cornstarch, baking soda, baking powder, and sea salt until combined. Set aside.
- Step 2: In another large bowl, cream the softened butter and white sugar with a mixer for about 2 minutes until light and fluffy. Add the egg and mix until combined. Stir in the peanut butter and vanilla extract, scraping the bowl as needed.
- Step 3: Gradually add the dry ingredients to the wet mixture, stirring until a uniform dough forms. Add purple gel food coloring a little at a time, mixing well until you achieve an even purple color, finishing by hand to avoid streaks.
- Step 4: Using a 1-tablespoon cookie scoop, portion dough into mounds on a parchment-lined tray, spacing close but not touching. Cover with plastic wrap and chill for at least 2 hours or overnight to ensure thick, non-spreading cookies.
- Step 5: When ready to bake, roll each chilled mound into a smooth ball and coat thoroughly in Halloween sprinkles or purple sanding sugar. Place on prepared trays, spacing about 2 inches apart. Bake for 9–11 minutes until cookies puff and crack slightly, then remove from oven.
- Step 6: Let the cookies cool on the tray for 5 minutes. While still warm, gently press an unwrapped chocolate kiss or Hug candy into the center of each cookie to form the witch hat tip. Immediately transfer the tray to the freezer for 10 minutes to set the chocolate. After chilling, move cookies to a wire rack to cool completely.
Tips & Variations
- For a nut-free version, substitute peanut butter with sunflower seed butter and use allergy-friendly chocolate candies.
- Add a few drops of peppermint or almond extract with the vanilla for a twist on flavor.
- Use different colors of gel food coloring to create a variety of festive witch hats.
- Chilling the dough overnight improves texture and intensifies flavor.
Storage
Store cookies in an airtight container at room temperature for up to 5 days. For longer storage, keep them in the refrigerator for up to 2 weeks or freeze for up to 3 months. To enjoy, let refrigerated or frozen cookies come to room temperature and, if desired, warm slightly in a low oven to refresh softness.
How to Serve
Serve this delicious recipe with your favorite sides.
FAQs
Can I make the dough ahead of time?
Yes, chilling the dough for at least 2 hours or overnight actually helps the cookies maintain their shape and develop better flavor during baking.
What if I don’t have purple gel food coloring?
You can substitute with any gel food coloring color you prefer, or omit coloring for classic peanut butter cookies. Gel coloring works best to avoid altering dough consistency.
Print
Best Witch Hat Halloween Cookies Recipe
- Total Time: 2 hours 30 minutes
- Yield: 33 cookies 1x
Description
These Best Witch Hat Halloween Cookies are delightful festive treats perfect for Halloween celebrations. Featuring a soft, purple peanut butter cookie base coated with colorful sprinkles and topped with a classic chocolate kiss, these cookies are both charming and delicious. The dough is chilled to ensure thick, perfectly baked cookies that are soft inside with a slight crack on top.
Ingredients
Cookie Dough
- 1 1/2 cups all-purpose flour
- 2 tsp cornstarch
- 1/2 tsp baking soda
- 1/4 tsp baking powder
- 1/8 tsp fine sea salt
- 1/2 cup unsalted butter, softened
- 1 cup white sugar
- 1 large egg
- 3/4 cup smooth peanut butter
- 1 tsp vanilla extract
- Purple gel food coloring
Decorating
- Halloween sprinkles or purple sanding sugar
- 33 chocolate kisses or Hugs candies, unwrapped
Instructions
- Prepare the Baking Equipment and Dry Ingredients: Line a sheet tray with parchment paper. In a large bowl, whisk together the all-purpose flour, cornstarch, baking soda, baking powder, and fine sea salt until well combined. Set aside for later.
- Make the Wet Cookie Dough Base: In a separate large bowl, cream the softened unsalted butter and white sugar together using an electric mixer for about 2 minutes until light and fluffy. Add the egg and mix until fully incorporated. Then add the smooth peanut butter and vanilla extract, mixing thoroughly and scraping down the bowl as needed.
- Combine Wet and Dry Ingredients and Add Coloring: Add the dry ingredient mixture to the wet mixture and stir until a uniform dough forms. Gradually add purple gel food coloring, mixing well to achieve the desired shade. Finish mixing by hand to ensure even color distribution with no streaks.
- Portion, Chill, and Prepare for Baking: Using a 1-tablespoon cookie scoop, portion the dough into mounds and place them close together on a parchment-lined sheet tray without touching. Cover with plastic wrap and chill in the refrigerator for at least 2 hours or overnight to prevent spreading and produce thick cookies.
- Coat, Bake, and Decorate the Cookies: Preheat the oven to 350°F (175°C) and line new sheet trays with parchment paper. Pour Halloween sprinkles or purple sanding sugar into a small bowl. Roll each chilled dough mound into a ball and coat completely in the sprinkles or sugar. Arrange the coated balls on the prepared trays spaced about 2 inches apart. Bake for 9 to 11 minutes until the cookies puff up and start to crack. Slightly underbaking is ideal for a soft interior.
- Add Chocolate Kisses and Cool: Remove cookies from the oven and let cool on the sheet tray for 5 minutes. While still warm, press a chocolate kiss or Hug candy into the center of each cookie until it sticks. Immediately transfer the tray to the freezer for 10 minutes to prevent chocolate from melting due to residual heat. After chilling, move cookies to a wire rack to cool completely before serving or storing.
Notes
- Chilling the dough is essential to prevent spreading and ensure thick, soft cookies.
- Adjust the amount of purple gel food coloring to achieve your preferred shade of purple.
- Slightly underbake the cookies for a soft, chewy center as they will continue to set while cooling.
- Using Halloween-themed sprinkles adds festive visual appeal, but sanding sugar or any colored sugar works well too.
- Freezing the cookies briefly after adding the chocolate kisses prevents the chocolate from melting and losing its shape.
- Prep Time: 20 minutes active, 2 hours inactive chilling
- Cook Time: 10 minutes per batch
- Category: Baking
- Method: Baking
- Cuisine: American
Keywords: Halloween cookies, witch hat cookies, peanut butter cookies, chocolate kiss cookies, purple cookies, festive Halloween treats


